
Call: 602-264-0707
What to Expect: The Dental Bridge Procedure Step by Step
July 16, 2026
Dental Bridges
Missing a tooth changes more than your smile — it can affect how you chew, speak, and even how your remaining teeth shift over time. If you’re researching options to close that gap, you’ve likely come across the dental bridge procedure as a reliable, time-tested solution. Many patients in Phoenix, AZ come to us unsure of what the process actually involves, worried about pain, or simply curious about the timeline from consultation to a fully restored smile. This guide walks you through exactly what happens at each stage, so you can walk into your appointment feeling informed and confident. If you’d like a closer look at how our team approaches tooth replacement with custom-fitted bridges, our restorative dentistry page covers the specifics in more detail.
Quick Answer: A dental bridge procedure typically involves two visits. During the first, your dentist prepares the adjacent teeth, takes impressions, and places a temporary bridge. About two to three weeks later, the permanent bridge is fitted, adjusted, and cemented into place, restoring both function and appearance.
Understanding the Dental Bridge Procedure
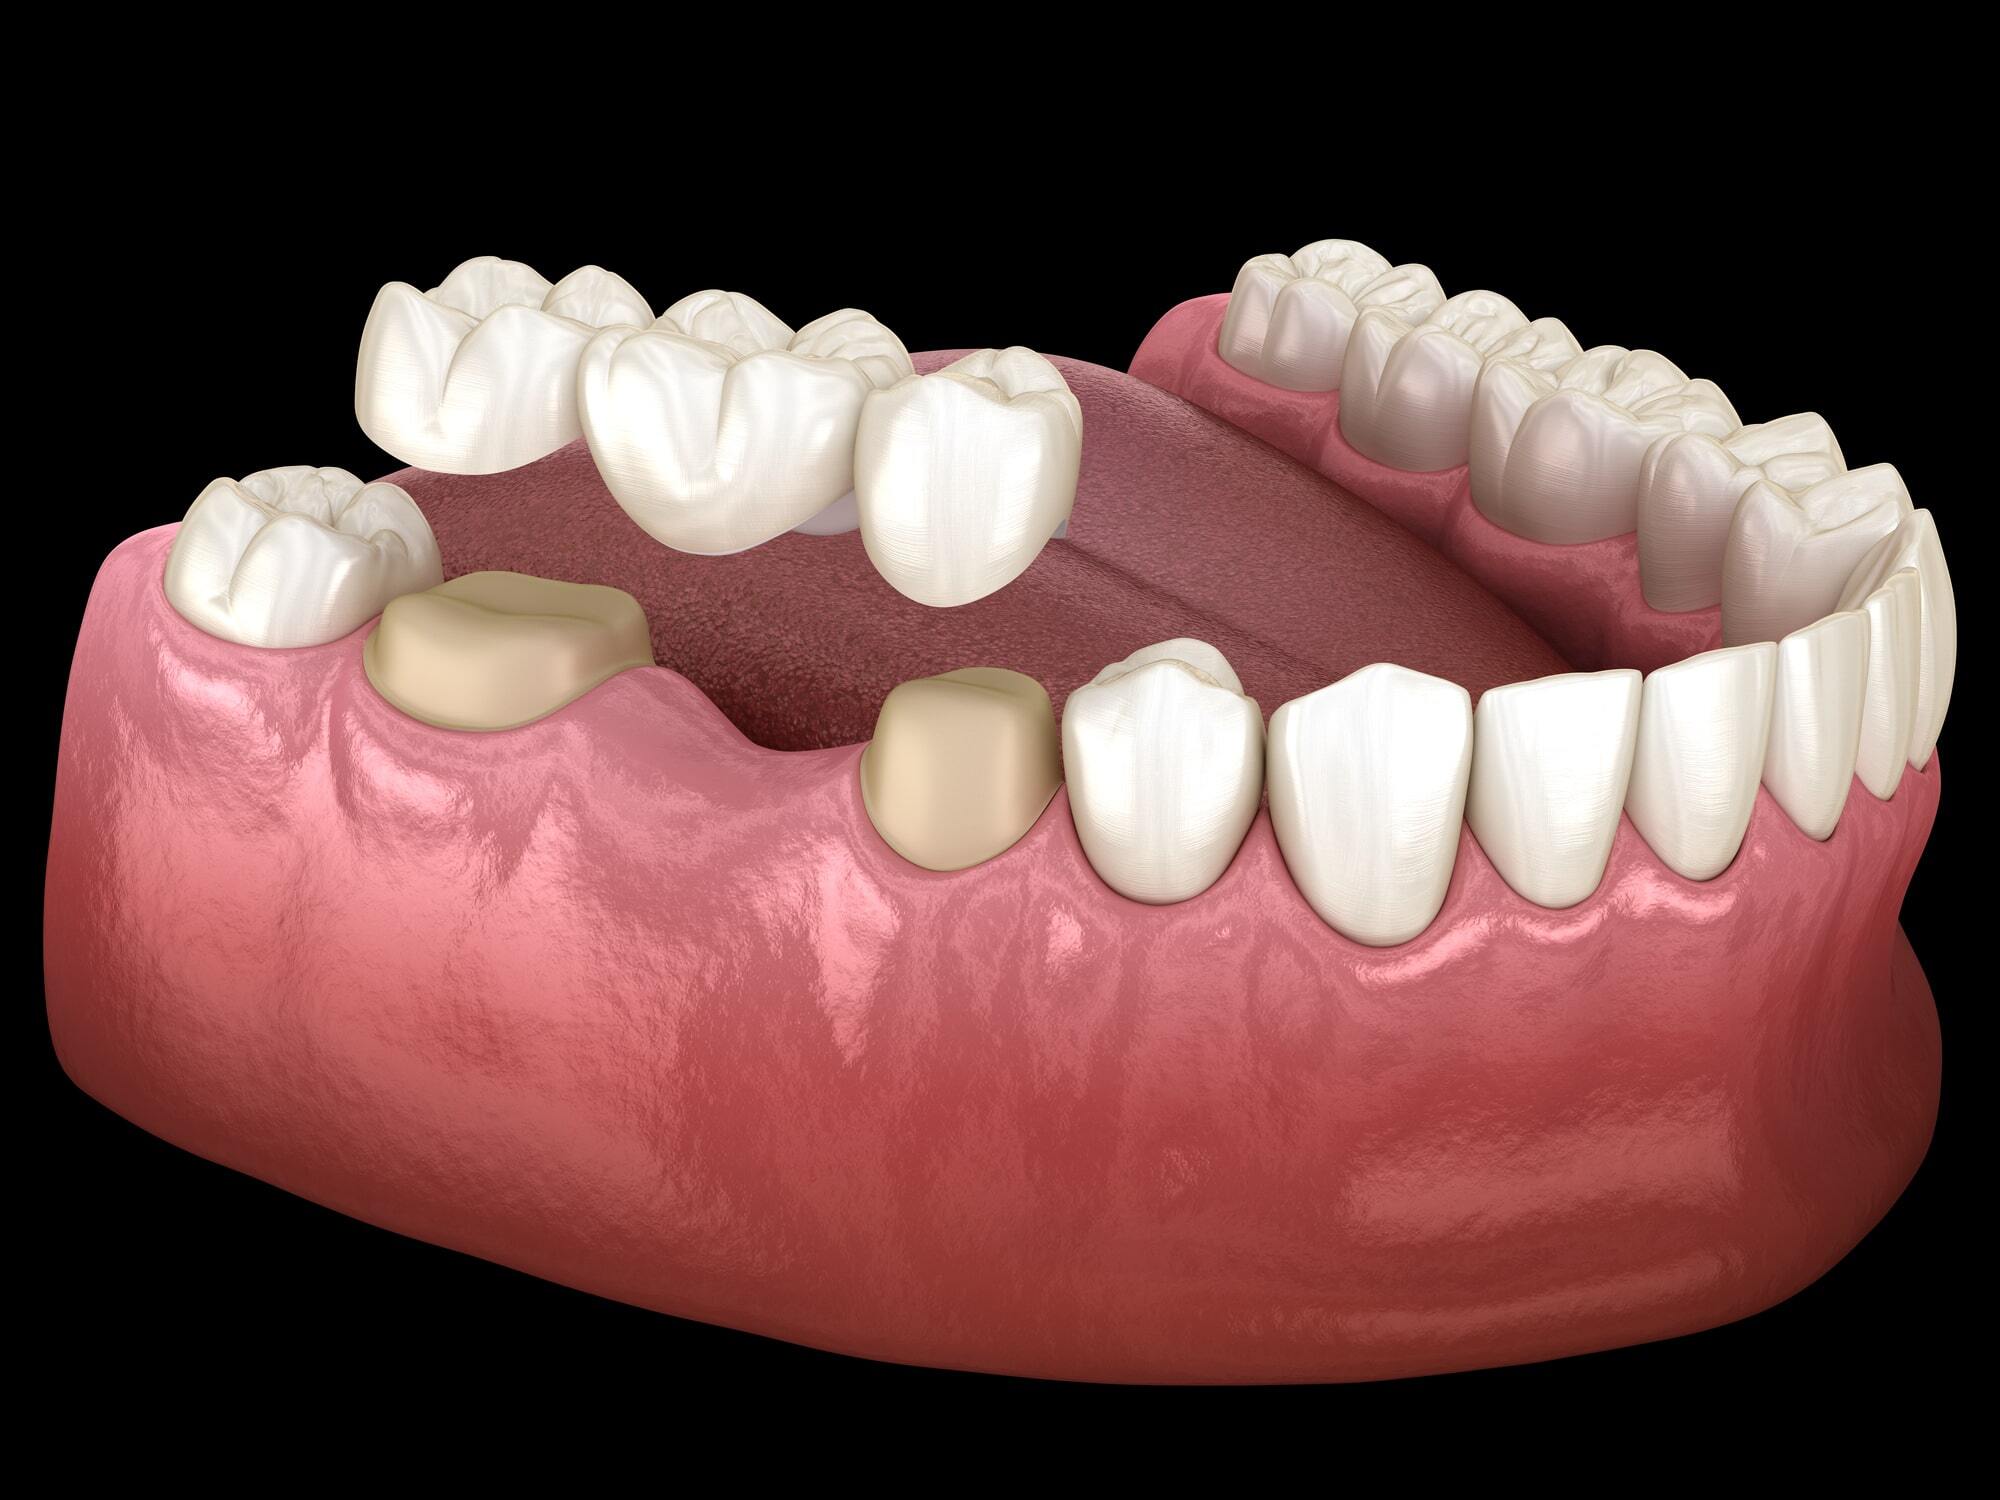
A dental bridge is a fixed prosthetic device that “bridges” the gap created by one or more missing teeth. It relies on the natural teeth or dental implants on either side of the gap — called abutment teeth — to anchor a false tooth, known as a pontic, securely in place. Unlike removable partial dentures, a bridge stays fixed in your mouth, offering a more stable and natural-feeling solution for chewing and speaking.
Bridges remain one of the most commonly recommended restorations in general dentistry, largely because they address multiple concerns at once: they restore the ability to chew properly, prevent surrounding teeth from drifting into the empty space, maintain facial structure, and re-establish a natural bite alignment. According to research published by the American College of Prosthodontists, tooth loss affects the majority of American adults by middle age, which is part of why bridges, along with implants and dentures, remain a cornerstone of restorative care.
Step 1: Initial Consultation and Treatment Planning
Every successful dental bridge procedure begins with a thorough evaluation. During this visit, your dentist examines the gap left by the missing tooth, checks the health and strength of the surrounding teeth, and takes X-rays to assess the bone and root structure beneath the gums. This step is essential because the abutment teeth need to be strong enough to support the bridge long-term.
Your dentist will also discuss which type of bridge best suits your situation. Traditional bridges, cantilever bridges, Maryland bonded bridges, and implant-supported bridges each have distinct advantages depending on the number of missing teeth, their location in the mouth, and the condition of nearby teeth and gum tissue.
Step 2: Preparing the Abutment Teeth
Once a treatment plan is confirmed, the preparation phase begins. Your dentist will numb the area with local anesthesia to ensure comfort throughout the appointment. The abutment teeth are then reshaped by removing a small portion of enamel, creating enough space for the crowns that will eventually hold the bridge in place.
This reshaping step is precise and conservative — only the necessary amount of tooth structure is removed to accommodate the crown while preserving the tooth’s overall strength. For patients who feel anxious about this part of the process, it helps to know that most people report only mild pressure rather than pain, thanks to modern anesthesia and gentle technique.
Step 3: Taking Impressions and Placing a Temporary Bridge
After the teeth are prepared, your dentist takes detailed impressions of your bite, either using a traditional putty mold or a digital scanner. These impressions are sent to a dental laboratory where technicians custom-craft your permanent bridge to match the color, shape, and size of your natural teeth.
While the permanent restoration is being fabricated, which usually takes two to three weeks, you’ll be fitted with a temporary bridge. This protects the prepared teeth, maintains normal chewing function, and keeps your smile looking complete during the waiting period.
Step 4: Fitting and Cementing the Permanent Bridge
Once your custom bridge arrives from the lab, you’ll return for the final fitting appointment. Your dentist removes the temporary bridge and carefully checks the permanent restoration for fit, color match, and bite alignment. Small adjustments may be made at this stage to ensure the bridge feels natural and comfortable when you bite down or chew.
Once everyone is satisfied with the fit, the bridge is permanently cemented onto the abutment teeth. For patients considering more advanced restorative work, our team at Highland Dental Studio Phoenix bridges page also outlines how implant-supported bridges compare to traditional tooth-supported designs, which can be a helpful next step if you’re missing several teeth or want a longer-lasting foundation.
Recovery and Aftercare Tips
Recovery from a dental bridge procedure is generally straightforward. Mild sensitivity to hot or cold temperatures and slight gum tenderness near the abutment teeth are common for a few days after each appointment. These symptoms typically resolve on their own without the need for prescription pain medication.
To protect your investment and extend the lifespan of your bridge, consider the following preventive habits:
- Brush twice daily using a soft-bristled toothbrush, paying close attention to the area beneath the pontic.
- Floss daily using a floss threader or water flosser designed to clean under the bridge, where regular floss can’t easily reach.
- Avoid excessively hard or sticky foods, especially in the days following placement, to reduce strain on the abutment teeth.
- Schedule regular dental checkups every six months so your dentist can monitor the bridge’s fit and the health of surrounding gum tissue.
With proper care, a well-maintained dental bridge can last between 10 and 15 years, and many patients enjoy their bridge for even longer.
Why Phoenix Patients Choose Professional Bridge Placement
Phoenix’s dry climate and active lifestyle mean many residents prioritize durable, low-maintenance dental solutions that hold up to daily wear. A properly placed bridge restores confidence in your smile whether you’re out at a business lunch downtown or enjoying an evening in Scottsdale. Choosing an experienced local dental team ensures your bridge is fabricated with precision, fitted comfortably, and backed by ongoing care tailored to your specific bite and oral health needs.
FAQ
How long does a dental bridge procedure take from start to finish?
Most patients complete treatment in two visits spaced two to three weeks apart, with the entire process typically finished within a month.
Is getting a dental bridge painful?
The procedure is performed under local anesthesia, so discomfort during placement is minimal. Mild soreness afterward is normal and usually fades within a few days.
How long do dental bridges typically last?
With good oral hygiene and regular dental visits, a dental bridge can last 10 to 15 years or longer.
Can I eat normally with a dental bridge?
Yes. Once fully cemented, a bridge functions like natural teeth, though it’s wise to avoid very hard or sticky foods that could loosen the restoration.
What’s the difference between a dental bridge and a dental implant?
A bridge relies on neighboring teeth for support, while an implant is anchored directly into the jawbone. Your dentist can help determine which option suits your dental health and goals.
Do dental bridges require special cleaning?
Yes, using floss threaders or a water flosser to clean beneath the pontic helps prevent decay and gum irritation around the bridge.
Recent Posts

Oct. 27, 2026
Why Do I Have Bad Breath Even When I Brush and Floss?

Oct. 22, 2026
What Are the Early Signs of Gum Disease?

Oct. 15, 2026
Is It Safe to Get a Dental Filling While Pregnant?

Oct. 06, 2026
How Do I Know If My Old Filling Needs to Be Replaced?
Sep. 29, 2026